Chevy Pick up Bed

Make Your Bed!
Installing A Classic Chevy Pickup Bed Do It Right, Do It Once, And Never Look Back
writer: Rob Fortier
In the past, I've been known to half-butt things just to get them done. I'm not talking about cutting corners to save costs or even doing things shoddily--I mean making due with what I had rather than waiting like a normal person for the right parts and, like the title says, doing it right and never looking back. Oftentimes, though, when you're working with deadlines, there just isn't time to wait! With this in mind, jobs of late have been "planned out" a bit more thoroughly in order to avoid the usual half-butting...well, sort of. Case in point this go 'round: The bed on my '53 Chevy.
From the get-go, I'd arranged to install one of Bruce Horkey's beautiful bed wood kits. Well, parts were ordered, and when the time came to put it all together, I realized the bed box wasn't nearly as worthy as I'd assumed, even for a temporary wood floor as initially anticipated (it would be taken out and then reinstalled after paint). As it turned out, upon a thorough investigation of the steel perimeter, if I'd attempted to put the wood floor in and fix the box later, I'd probably end up having to buy another wood kit. It was that bad. For starters, the front panel had at some point been welded to the cross sill; the forward set of wood blocks was replaced with heavy steel industrial shelving brackets, which were welded in place; the bed panels themselves were in need of hours and hours of repair; and, among other things, the majority of the bed was held down to the chassis with C-clamps--ones I put on to band-aid all the broken welds that previously "secured" it. Long story short, I should have been planning a complete bed rebuild before I even considered the wood floor!
OK, one step forward turned into two steps back. Fortunately, there were people out there just waiting for someone like me to come a callin'. People like Chevs of the 40s, Brothers, and, of course, Horkey's Wood & Parts. At first, I thought I could get away with just rebuilding the bed sides and forward panel, leaving the stock tailgate for a later restoration. Wrong. After spending a couple of hours on the old gate, I threw in the towel. But because I'd already ordered the panels from Chevs of the 40s and it was late in the game (yeah, as usual), I relied on my neighbor, Brothers, for the tailgate, which they luckily had in stock. As for the lower supports, Horkey previously included the three cross sills with the wood kit, and after I explained how the rear main cross sill had been poorly welded to the chassis AND the bed sides, Bruce made sure I ordered a new one. Another long story short, my old bed is now "yard art" around
Once the rear suspension was wrapped up, I refocused on the sheetmetal. With the bed box finally complete, I can once and for all get that wood kit finished and installed. From there, I will replace the beat-up old fenders and running boards with replacements from Goodmark Industries. Stay tuned--and remember, do it right, do it once, and never look back!
|
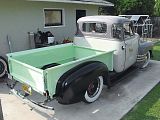
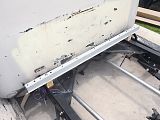
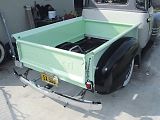
Sure, it looks pretty decent now, but the bed was anything but presentable, as you will see.
|
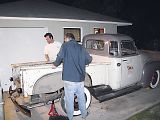
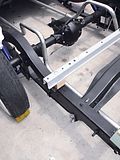
Back when the torque-tube rearend and its affiliates were discarded... |
...the old bed was removed from the frame, never to be remated to the chassis ever again. |
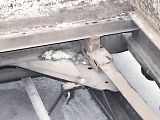
After only a few trips around town, I'd notice an increasing rattle out back--the welds had broken loose from the rear cross sill brace. An available C-clamp was called to duty to temporarily fix the problem. |
|
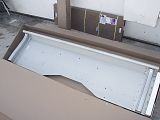
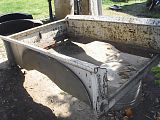
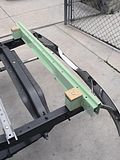
Realizing the existing bed box was close to being "beyond" repair, I contacted Chevs of the 40s for a brand-new set of shortbed side panels, complete with stake pockets and pre-drilled fender-mounting holes--just like the originals. |
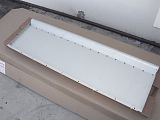
Considering the front panel was worse off than the sides, a new one of those was also ordered from Chevs of the 40s. |
As for the fate of the old rear cross sill, Bruce Horkey thankfully recommended that way back when the wood kit was ordered, so I was set on that part. Now, all the parts were pre-fit before being sent off for a fresh coat of paint at JBC. |
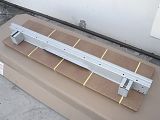
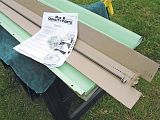
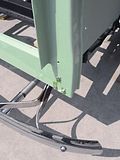
Front cross-sill placement is easy to figure out, but make sure the holes drilled in the vertical side face forward, as they're meant to mount to the front panel. The galvanized clips slide onto the bottom of the brace, while the canvas piece goes between the wood spacer block and the frame. Also, make sure you use the center-drilled pieces up front; the offset ones are used on the rear-center brace. |
Using the longer carriage bolts, I attached the front brace to the chassis as shown. I made sure not to completely tighten the nuts, as I wanted to be able to manually coerce them for fitting later. |
The rear-center cross sill was mounted in the same fashion as the front one. The forward center cross doesn't come into play until the actual wood is installed, so that was set aside for now. |
Since the rear formally attaches with the floor in place, I used a couple of pieces of scrap wood to simulate and allow the brace to set in its actual place. |
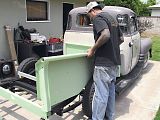
Traditionally, it's recommended to assemble a bed "off" the truck. However, when going at it alone, it turned out to be a lot less cumbersome to actually put all the pieces together on the frame, where they would end up anyway. Before doing so, I inserted the mounting rod in the forward panel, as it's easier to fish through from top to bottom. |
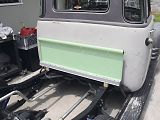
With a towel spaced behind the front panel, it was attached to the cross sill with the supplied 1/4-20 hardware. |
Very carefully, the first side panel was set in place. I first gently slid the rear corner over the rear brace already mounted on the frame, then lined the front up with the mounting rod and quickly fingered the nut on. |

To keep the mounting rod from spinning or even backing out the opposite side, a nut and washer were put behind where the side panel mounts. Once that part's secured, the row of vertical holes were carefully lined up and then fitted with hardware. |
Even though it's only temporary, 5/16x1 hardware was used to secure the rear of the side panel, as it would otherwise eventually work itself off the cross sill with all the work going on. |
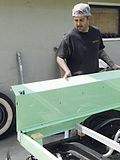
With the left side on and mocked in place, the right side followed in the same manner. |
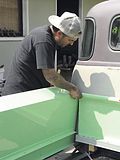
It wasn't too difficult to get the bed panels together without any extra help, though I did call on the little missus to take a photograph or two for me, as my free hand wasn't always free. Also, I'd highly suggest using masking tape on areas that might come in contact and easily scratch. |

Looks aren't everything--just to make sure, I pulled a tape measure from side to side and corner to corner to verify the box was square. It was, with but a 1/16th of an inch of variance, if that, anywhere. |
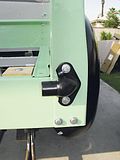
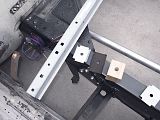
The job progressed with the tailgate hinges, which bolt directly onto the backside of the rear stake pocket, as shown. |
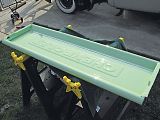
As mentioned in the story, when I ordered the bed panels, I assumed the original tailgate would suffice. It wouldn't, so I headed over to Brothers to grab a new one, which JBC also painted with my custom-mixed Apple Green. Unlike new gates, the early ones don't have a cutout for one side to slip over a hinge, so install accordingly. |
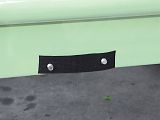
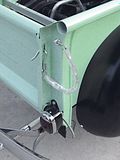
Breaking tradition as usual, I stuck with the '54 license plate mounting location. The rear cross sill is marked where the holes need to be drilled. I opted to use a piece of fender welting to sandwich between the Brothers bracket and the fresh paint. |
Things are finally starting to look like a properly made bed. You'll notice I first attempted to reuse the old tailgate latch chains... |
...those didn't fly, so a new set was quickly installed, making the bed right. Now, finally, sights can be set on getting the new bed wood floor finished and installed! Stay tuned. |
|


